How to Set Up Your Multisport Kayak and Wing Paddle
In this guide, you will learn how to set up and adjust your multi-sport kayak and wing paddle.
Why Getting a Good Kayak and Paddle Fit Is So Important
If you don’t set your boat set up correctly, you are not going to be able to balance your kayak effectively and you may not be able to steer away from river-obstacles in time!
And if your paddle is set to the wrong length, or set to the wrong angle, you are not going to be able to paddle powerfully or efficiently - You will be slow!
Spending a little extra time ensuring you have the correct knee position, foot position, paddle angle, and paddle length is going to set you up for your best chance at success with kayaking.
Where Should Your Knees Be In Your Kayak?
Your knees should be bent and positioned out to the side (wider than your hips).
If you are in the correct position, your knees will touch the inside of your kayak. This leg position allows you to brace your knees inside your kayak for balance when going through rapids.
Being able to brace your knees like this, will also make it easier to lean (edge) your kayak away from side-currents in the river.
Failing to edge at the correct moments is the single biggest cause of capsizes on grade 2 rivers. So you definitely want to ensure your knees are in a good position for bracing!
More advanced paddlers may choose to have their knees positioned a little closer together. This makes it easier to generate power from your legs during forwards strokes.
As a beginner, your number 1 priority should be stability - and avoiding a swim! So set your knees wide, and have them ready to brace against the inside of your boat.
How Far Away Should Your Foot Pedals Be In Your Kayak?
Ensure your pedals are close enough so that you can steer in both directions while your knees are braced to the sides.
If you have to straighten your legs (or drop your knees away from inside of your boat) in order to operate your foot pedals, then your pedals are too far away – so move them closer to your seat.
If your knees are being forced into the sides of the boat without any wiggle room at all, then try moving your foot pedals one notch away for improved comfort and forward stroke performance.
How Do You Adjust the Foot Pedals and Rudder-Lines in Your Kayak?
Barracuda Kayaks have self-adjusting rudder-lines. So you can simply move the foot pedals to the correct position without the need to re-tension the lines that connect your pedals to the rudder.
Most other brands of multisport kayaks require that you re-tension the rudder-lines each time your move the foot pedals to a new position.
How to Tension Your Kayak Rudder-Lines on Land:
-
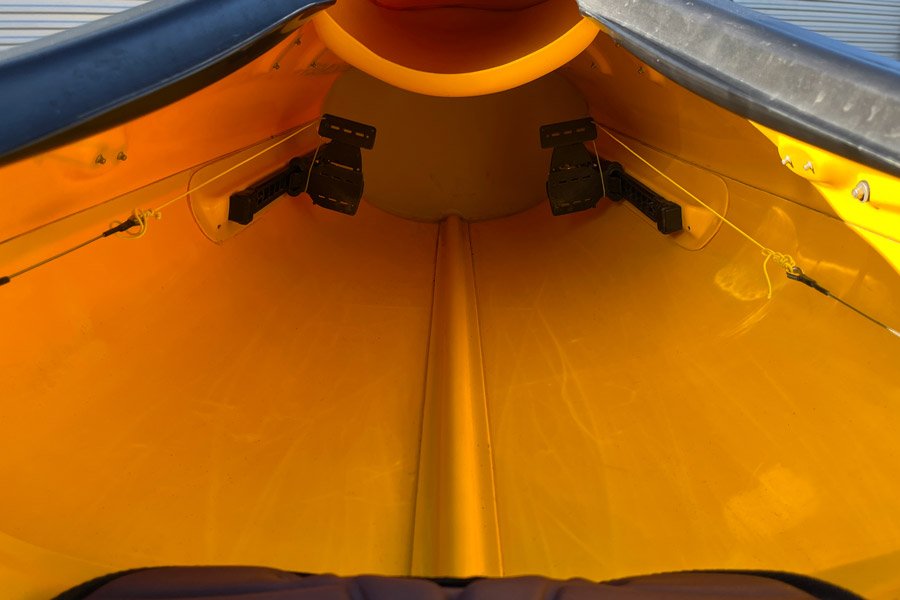
Look for 2 adjustment straps inside your cockpit attached to the foot pedals. Each foot pedal has its own adjustment strap. Loosen these 2 straps.
-
Move your foot pedals to the desired position.
-
Have another person (at the back your boat) hold your rudder exactly straight.
-
While your rudder is being held straight, re-tighten the adjustment straps so that there is no slack in the rudder-lines.
-
Use the adjustment straps to fine tune your steering. Ensure the flaps of your pedals are in a vertical position, or slightly angled towards your seat.
-
With another person holding your rudder off the ground, sit your kayak and test your steering with your feet.
-
Re-adjust the tension as required until you have even steering left and right.
I suggest you learn how to fine-tune your rudder-lines while sitting in your kayak on the water. This is an extremely valuable skill to develop. You don’t want to waste time getting out of your kayak each time you need to make a minor adjustment to your kayak’s steering system - especially during a race!
How Should the Seat in Your Multisport Kayak Fit?
Your hips should fill the entire width of your kayak seat, without being uncomfortably tight.
The more space you have between your hips and the sides of your seat, the more sloppy you are going to feel in your boat - particularly once you are paddling down rapids.
If you have excess space at your hips, pad this area out with closed-cell foam. This will dramatically increase your ability to balance your boat using your hips.
If you have narrow hips and paddle a Barracuda kayak, we highly recommend purchasing and installing a pair of Rasdex Hip Pads. These are adjustable, so you can customise the thickness of the pads very easily.
If you only have a small amount of space at your hips you to pad, then you can simply duct tape a closed-cell foam pad into the side of the seat. A $20 camping mat for your local hardware store is a great source of closed-cell foam.
How Do You Select the Correct Paddle Angle?
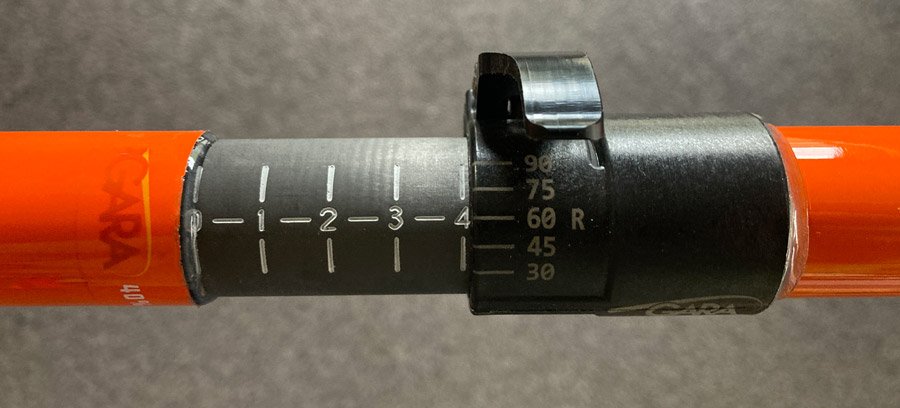
60 degrees of paddle angle is what most multisport paddlers use. So I suggest you start with 60 degrees.
Most adjustable wing paddles have an adjustment dial in the centre of the shaft, so you can select 60 degrees easily.
Just make sure that if you intend to paddle right-handed (naturally right-handed people tend to paddle right-handed) that you set up your paddle to 60 degrees in the RIGHT-HANDED configuration!
To check you have your paddle set up right-handed, hold your paddle in front of you with your right blade’s power-face facing you. In this position, your left blade’s power-face should be aiming up towards the sky (at 60 degrees). If your left blade’s power-face in pointing down toward the ground, your paddle is set up left-handed and you may want to change it.
Where Should You Position Your Grip on Your Paddle Shaft?
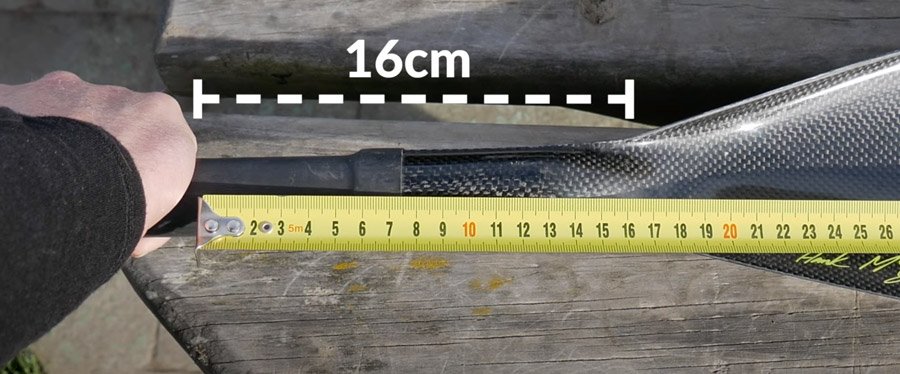
You want to have about 16 centimetres of space from your hands, to the start of your paddle blades.
How to Ensure You Maintain a Good Grip Distance:
-
Use a tape-measure to find 16 centimetres from the power-face of each blades.
-
Mark this position at both ends, by wrapping insulation tape around your paddle shaft.
-
Grip your paddle shaft, insuring your hands are on the inside of the tape.
-
Mark the inside position of your hands using insulation tape.
-
Measure again. Double-check you have your wraps of tape 16 centimetres from the blades - and that both ends are even!
-
Paddle with your hands in between the tape.
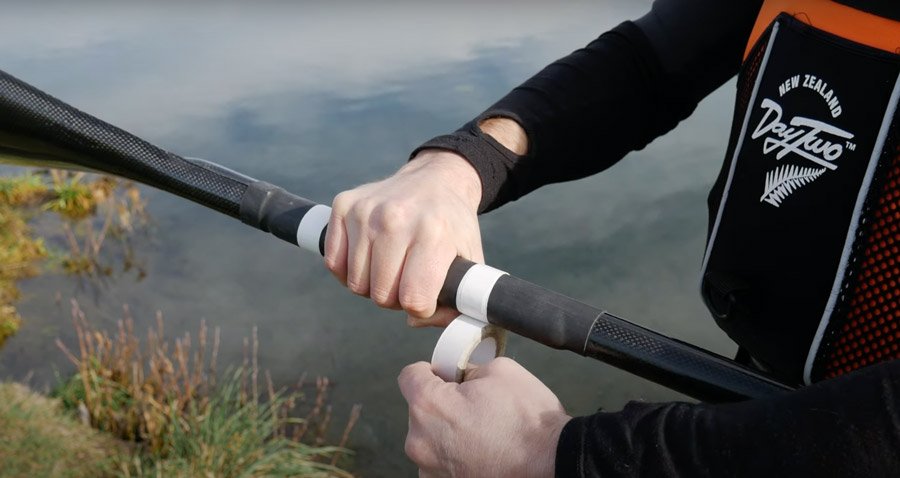
Tip: Some people like to wrap the tape many times around the shaft, creating thick bumps either side of their hands. This can physically prevent your hands from sliding around on your shaft.
What Length Should Your Multisport Paddle Be Set To?
Ensure you have chosen a paddle that is roughly the right length for you based on your height. Read the article: Buying Your First Paddle for the Coast to Coast Race
Once you have your hands positioned about 16 centimetres from your blades (as described above), move the adjuster in the centre of your paddle shaft so that your hands can be about the width of a push-up position (or bench-press).
This grip-width should put you close to your most naturally strong position.
Once you have kayaked with your paddle at this length for a couple of sessions, experiment with slightly different lengths (adjustments of around 2 centimetres will create a noticeable difference).
Make note of how different length settings affects your comfort and performance.
It can take several months of fine-tuning to find your optimal paddle length. So don’t stress about it too much during the early stages. Just ensure you have your paddle set up “about right” so it feels comfortable for you to use.
Key Points to Remember About Kayak and Paddle Setup:
-
Having the correct kayak and paddle setup is vitally important for your comfort, safety, and performance. So take the time to get it right.
-
Your knees should be in a bent and wide position. You should be able to brace your legs against your boat for balance.
-
Your foot pedals should be positioned at a length that you can steer with your rudder in both directions while your knees are braced in your kayak.
-
Check the tension in your rudder-lines and adjust as necessary. You want both pedal flaps vertical when your rudder is straight.
-
If you have excess space at your hips, pad out the area in between your hips and the side of your seat. If you are uncomfortably tight at your hips, consider installing a wider seat.
-
Set your paddle angle to 60 degrees. Check this is set to the right-handed position (if you intend on paddling right-handed).
-
Grip your paddle shaft with 16 centremetres of space between your hands and the power-face of your paddle blades. Use insulation tape to mark this position.
-
Adjust your paddle length so that your grip width is similar to that of a strong push-up or bench-press.
-
Don't be afraid to play around and adjust things. Find a position that feels good to you!