Learning to roll your kayak is a process of constant refinement. Here are 7 tips that will help you achieve rolling perfection.
It all begins with a good set-up position. Having your hands too low in the water reduces the amount of wind-up in your torso, and sets your body too deep into the water.
To set-up correctly, both hands should be thrust as high as possible into the air, with both arms hard against the boat. Your body should be fully rotated to the side, bringing your hands up in line with your hip.
This point is where so many people go wrong, resulting a roll that feels heavy and laboured. The fault is to use the active blade like a scoop, loading the blade face up with pressure. This often results in a blade that thumps the water and begins to sink, pulling you down with it.
The correct blade angle, involves tilting your wrists back slightly, setting the blade flat to the surface. Now you’ll be slicing the blade through the water like an aeroplane wing, creating lift energy as it glides. You should feel virtually no pressure on the blade face, and the paddle will slice the surface effortlessly.
Naturally, we are tempted to pull down on the paddle to lift ourselves up, right? Wrong. When you pull down on the paddle, your arms and body then follows – Pull down and you’re going down. Eventually, the paddle shaft becomes more vertical, making it nearly impossible to use the blade for support.
Instead, try pushing or “reaching” the front bade out away from the boat – as far across the water as you can stretch. Doing this will cause your torso to rise to the surface, and begin to naturally activate your “rolling knee” (see below).
Lifting the head is a symptom (but not the cause) of engaging the wrong knee/hip. To roll your kayak easily, you’ll need to engage your lower knee (right knee in R picture above). If you try to lift your body up too soon, you’ll be using your top knee (left knee in L picture above). When your top knee engages like this, it begins to reverse the roll, pulling your kayak back over on top of you.
To correct this problem, maintain pressure on only your lower (right) knee throughout the entire roll. Keep your top leg relaxed and crunch your waist down into the water, resisting the urge to sit up.
Look at the position of the left hand in both pictures above. If you punch your back hand out or across your kayak, you will either sink the paddle too deep into the water, or find yourself so far off balance that you drop back in.
Your back hand should be your pivot point during the entire roll. It should remain on (or near) your same shoulder with your elbow low and bent.
Loosing balance as you finish, or tipping in on the opposite side, is often the result of leaning back, looking up, or jerking around suddenly (maybe from the shock it actually worked).
The best way to finish the roll, is to continue watching the active blade all the way through until the very end. This helps you to rotate your torso, bringing your boat under your hips (without the need to sit up). You should be centred over your seat. And as your kayak rights itself, smoothly roll your wrists back, opening your palms to the sky maintaining a slicing blade.
If you don’t think you can roll, you cant. Like many aspects of kayaking, having self-belief is a powerful thing. As soon as we begin to doubt ourselves underwater, the reality of the situation soon sets in – “I’m stuck underwater, hurtling down a river out of control”. The natural reaction is to panic, and either wet-exit straight away, or attempt some shocker of a roll that has no chance of working.
To roll reliably you need to remain calm underwater, believe in yourself, and focus on a good quality technique. If you can focus on making your roll stylish, and not give up after the first try, the results will soon follow.
]]>If you're new to kayaking on the Waimakariri River, here's is some guidance around what to check, and what different weather and flow conditions will be like in relation to multisport.
River Flows: Waimakairi Esk Flow Gauge: Below 0.8m and dropping. Waimakariri Otarama Flow Gauge: Below 150 m3/s and dropping.
Wind Speed: Canterbury High Country Wind @ 1000m: Below 50 km/h.
Rain & Weather: Arthur's Pass, Carrington, & Esk Rain Gauges: No rain in last 24 hours. Arthur's Pass Forecast: Good weather, warm and dry. Freezing level above 1000m.
There are four electronic gauges on the Waimakariri River, all maintained and monitored by Environment Canterbury. For paddling the Coast to Coast route (Mt White to Gorge Bridge) we are interested in the two uppermost sites; Esk & Otarama.
The Esk River is a smaller tributary that flows into the Waimak' just above the start of the gorge (about 25km downstream of Mt White). The Esk Gauge is located in the Waimakariri River, about 2km downstream of the Esk/Waimak' Confluence. This gauge will normally provide the earliest confirmation that our river is rising (or falling).
The Esk Gauge gives a reading in metres (how deep it is at that spot). A good paddling range for this gauge is between 0.25m - 0.8m. Make sure the trend is clearly dropping, (or steady at very low flow).
The Otarama Gauge is located on the Waimakariri River around 5km upstream of Woodstock, (or 20km upstream of Gorge Bridge).
Because this gauge is measured in cubic metres per second ("cumecs"), it is often the reading we use when communicating the flow level between paddlers, and is the preferred gauge used by our guides.
However, because of the technical nature of calibrating this type of gauge, the reading can often be pulled out of accuracy by a shift in the loose gravel river-bed. The riverbed is most likely to change shape during times when the river is changing flow-rates quickly. So be aware that this gauge may not always be true and accurate, especially following a major flood, or when manual calibration hasn't been performed in a while. Obtaining local knowledge of the gauge's current accuracy is the key, particularly when 20 or 30 cumecs variation would mean the difference between going paddling or not.
A good paddling range for the Otarama gauge is between 30 - 150 cubic metres per second.
At flows around 30 cumecs, the top section of the river is a scrape and it can be challenging to stay in the correct braid. The Rock Gardens will definitely have rocks protruding the surface with a thread-the-needle line in spots. Bluff corners will be tight with large boils, and wave trains like Salmon Rapid will be rough and bouncy. You will obviously have a slower trip downstream with less speed in the river. Many novices actually prefer a low flow, as it feels like you have more time to move your boat into position, and while the features can be more technical, they can seem less intimidating in a way.
I think the Waimakariri River is at it's best around the 80 cumec level. The top braids can still provide a challenge in navigation, but when done right your efforts are rewarded with smooth flowing lines from one branch to the next. The Rock Gardens are usually the most challenging at this flow. The rocks are still protruding and need respect, but there is also a decent amount of water kicking up quality wave trains to make things extra interesting. Bluff corners will have a little more room, and some will have multiple line options (such as going inside or outside of the boils). For the adequately skilled, wave trains are their most fun (but not overly difficult) at this flow.
At levels around 130 cumecs, you better be sure the river is actually at that level, and not higher due to gauge miss-calibration mentioned earlier. I love guiding at this flow. To be completely honest, maybe that's partly due to the noticeably less physical effort required to make the distance. But, I also know that if we can get clients on a good line early, we can avoid a lot of the bigger more powerful features that exist at these levels. On guided trips, we tend to actually have less client-swims, which seems counterintuitive I know. Of course, un-guided at these flows will feel like you have way less time to determine your line. Plus, any mistakes can quickly get out of control due to the speed and width of the river. Self-rescuing becomes much harder, and any swims become longer and colder. We find ourselves rescuing un-guided parties most often during higher flow days.
Of all the factors that force us to call a guided trip off, a strong westerly wind would easily be the most common. While it seems obvious to check the river level before going kayaking, checking wind-speed is often over looked, or underappreciated. Knowing which forecasts to check, and what they mean for kayaking down the Waimak' is a constantly evolving art-form of trail and error. I've made the call to go on well over a hundred trips now, and here's what I'd like to tell you about wind...
Metservice is New Zealand official forecaster, and while they can be a bit vague at times compared to other computer modelled websites such as metvu, or windy, I like to know that there is a real person (who is certainly more qualified than me) looking at the data and providing a plain language interpretation. If the forecast is vague sounding, I take that into account and prepare for a range of possibilities.
A good wind speed for paddling on the Waimakariri River is anything up to 50 km/h. However light northwesterly is ideal. Interestingly, light or no-wind in the forecast can actually produce a strong head-wind in the Gorge during summer.
A tailwind is nice, to a point. Once foretasted wind speeds from the western half reach gale 65 km/h or higher, you can easily get blown off your line in your long lightweight boat (and into trouble). I've seen plenty of good paddlers blown upside-down at wind forecasts around 65 km/h.
If things are looking good so far, you better be sure they're going to stay that way. More rain in the catchment could mean the river is on the rise, or worse, about to flood. A cold southerly change could be just around the corner, bringing hail and dangerously cold temperatures (even in February) while you're isolated in the Gorge.
Pretty much all the rain that may be falling (or has recently fallen) around these gauge sites is going to make it's way into the Waimakariri River. So it's super important you check them. Anything more than about 10 mm (total per rain event) is going to increase the river flow. More than about 30 mm total is when we start to think about whether the river could spike outside of recommended flow ranges. Of course, it all depends how high the river was to begin with, the duration of rain, how saturated the ground is, the effect of evaporation... basically it's bloody hard to say how much rain is equal to how many cumecs the river will gain. If you can figure it out, please let me know! I have a pretty good feel for it now, but essentially you want no rain in the last 24 hours to be safe.
Looking at the forecast in the Arthur's Pass area will give you an idea of any rainfall amounts that are expected. There are three sites you can look at; Carrington Hut, Carroll Hut, and Avalanche Peak. All three are relevant.
It's also worth looking at the freezing level (lower is colder). A freezing level of around 3000m or higher would be ideal, but things are more than tolerable down to 2000m with the right layers on. If you're seeing freezing levels below 1000m mid-summer it's likely to feel icy-cold, especially once you're damp and have a wind-chill factor involved.
Remove the guesswork, and have a safer experience on one of our Waimakariri Gorge Trips. Not only can we accurately assess the conditions, we'll also provide a complete safety system including rescue and communication options. Plus, we think you'll learn a lot from our guides who know this river better than most.
]]>Every year, hundreds of beginners are learning to kayak for the Coast to Coast Race. Here are the 5 most common Coast to Coast training mistakes, and how you can avoid them.
With so many different models of multisport boats to choose from, buying the wrong boat for your ability is a common first mistake. If you’ve had a look around at the options already, you’ll notice quite a difference in the length, and more importantly – width, of each model. Essentially, the longer and narrower the design, the more potential speed you’ll be able to generate (but the more skill you’ll need to keep it upright and under control).
In an effort to make things clearer, manufacturers will class different boats into different categories: “stable/beginner”, “intermediate”, and “advanced/elite”. Now let’s imagine you’re a beginner with no river paddling experience, aiming to do Coast to Coast in 6 months time. Which class of boat should you buy? You: “Well I don’t want to be in the stable/beginner category, that sounds a bit lame, surely I can be better than that. The advanced/elite category sounds too egotistical, I’m not trying to win the thing. Let’s grab an intermediate boat, that feels like a good compromise, surely I can handle it”.
If you’re reading along thinking that sounds pretty logical, I don’t blame you, but my reaction… Noooo! If you’re a beginner, get your butt in a stable boat where it belongs. Trust me, you won't regret it. That’s the reason these designs exist, for you to learn in and have success. You’ll be much faster in a boat you’re stable in, and you'll enjoy kayaking a lot more. There’s going to be enough to learn in the next few months without having a boat that’s constantly trying to put you in the drink.
If you’re worried you’ll out-grow a beginner boat in a couple months, well… you probably won’t. It takes a few seasons to become comfortable in the intermediate category.
For an example of a really nice beginner multisport boat, check out the the Barracuda Beachcomber.
Learning to roll simply makes sense. If you flip, you can simply glide your paddle across the water, and gracefully resurface to complete the race. Brilliant!
Well, if you’ve ever actually tried to learn how to roll, you would have discovered the truth – it’s not quite that easy. The kayak roll is a complex movement that requires plenty of patience, persistence, and a good coach to guide you.
At Canterbury Kayaking, we teach rolling as part of our Grade 2 Certificate Course, with about three out of four people leaving the course with a roll. The problem many people face however, is once the course is over, they lose their roll through lack of practice.
Now is the time to repeat, repeat, repeat. Make this movement second nature. Make it your highest priority to have a roll that works “in combat” (in the real event). You may have a roll that works in the pool or lake, but frustration develops when you swim on the next river trip.
While many people are discouraged from practising their roll after a swim, you should be encouraged! If you can roll in the pool, there is no practical reason that it can’t work in combat. You have come this far, all it may take is to practice a few dozen more times, and next time… Boom, it works! No more swimming.
This pains me to see. The race we’re training towards is on grade 2 whitewater, so why on earth are we spending more than 90% of our time paddling on dead flat water? It simply doesn’t make sense.
Now I do get it, we aren’t all so lucky as to have the Waimakariri River right on our doorstep. Yes, it is logistically easier to head to the local pond than to organise a crew for a river trip. There’s certainly a safety component involved too. I would never recommend first-year paddlers get on a grade 2 run without a qualified guide or experienced support group.
So what is the solution to ramping up your moving water time safely?
Firstly, upstream paddling. Find a local river, free of trees and debris (or other potential hazards), and put your boat in pointing up river. There doesn’t need to be rapids, a steady flow that you feel safe on will do. Paddling up against the flow is a wicked workout. Plus with every stroke you’ll be building your comfort with having moving water under your boat.
Secondly, take advantage of your local whitewater club. There is a good reason we paddle whitewater boats in our grade 2 kayak course. It’s because on these runs, you get to spend a large majority of your day playing and learning on grade 2 river features. You’ll spend very little time on flat water, and therefore your moving water skills will skyrocket. Throughout New Zealand, there is a whitewater community in nearly every town, you just need to find it. Get involved in as many trips as you can.
I know I said you have to get off the lake. But turning up for a full Waimakariri River Trip before you’re ready may spell disaster for your self-confidence.
The mistake is forgetting to take those baby steps that make the road to success a smooth one. Even with a freshly signed grade 2 certificate in hand, a Waimak' Trip might still be too much of a jump right now. You probably need to keep building your comfort with easier runs, until you feel so solid on these, it feels like the lake.
I realised the importance of this a couple years ago, and have since created our multisport Skills Improvement Course. On this course we help you make the step from basic training (grade 2 kayak course), to the Waimakariri Gorge. We do this through a series of fast paced, baby steps, or “progressions”. We spend a brief time on the lake, then move to faster and faster water through a series of drills. And before you know it you’ve successfully paddled the Gorge!
Think about how you can break down your goals into bite sized chunks. It’s not necessarily about moving slower, but rather through a logical process that builds success on top of success.
Advice only works if you follow it. Remember that karate movie where the guru will only work with the apprentice if he pledges to follow all instructions without question? Well, I’ve never asked a client to trust me to that extent, although it is tempting sometimes...
The problem with taking some advice from me, a little from a book, the guy at the kayak shop, and your uncle who did Coast to Coast back in 1983, is that there’s very little continuity, and this leads to confusion. Everyone has a different take on how you should best train for this race, and this can leave you feeling like every step is the wrong one.
As coaches, some of the stuff we tell you to do might not be all that fun, or even make much sense in the moment. But beware of cherry picking for only the advice you want to hear, while missing the crucial things that can make all the difference. Doing the easy stuff is easy, doing the hard work is often where the biggest advantages are. Choose just one or two qualified coaches or mentors, and trust their advice.
If you’d like to learn more about how I can help you achieve success in the kayak stage of the Coast to Coast race, please check out my home page. If you are keen to get started now, the best place to begin is with my Grade 2 Certificate Course.
]]>The Waimakariri River was around 72 cumecs when I recorded my footage 7 days out from this year's event. But it has risen to over 200 cumecs since then!
In this video I'll show you my lines for a safe and efficient Coast to Coast race.
]]>If you're considering participating in the Coast to Coast race or getting started with multi-sport kayaking as a beginner, one of the key decisions you'll face is choosing the right kayak.
With numerous options available, it's crucial to select a kayak that suits your weight, skill level, and training needs.
In this section, I’ll walk you through the process of determining whether buying your own multi-sport kayak right now is necessary, debunk the myth of the "faster boat fallacy," outline the essential features to consider in your first kayak and provide recommendations for 3 beginner models specific to your weight category.
One of the first questions that arise when starting your kayaking journey is whether you should invest in your own kayak now, or rely on rentals.
In this section, I’ll discuss the benefits of owning your own kayak early on, particularly when preparing for the Coast to Coast race.
While rentals are an option, they can create unnecessary barriers to accessing valuable training time on the water.
If you're serious about taking on the Coast to Coast, I’d highly recommend investing in your own multisport kayak as soon as possible.
Unlike other endurance sports, kayaking involves some additional logistical challenges. Simply getting to the water requires effort and planning.
Renting a kayak every time you want to train can become inconvenient, expensive, and time-consuming. By owning your own kayak, you eliminate these barriers and make training more accessible.
Having your own boat enables you to hit the water whenever you want, ensuring you can get the necessary training hours in.
When you rely on club kayaks or rentals, you may not have the opportunity to use a kayak that suits you perfectly. Owning your own boat allows you to choose a multi-sport kayak tailored to your body type and skill level.
This enhances your overall experience, making training and racing more enjoyable and productive.
By purchasing your own kayak, you ensure a consistent experience every time you hit the water. You become familiar with the boat's characteristics, handling, and manoeuvrability, which helps build your skills and confidence.
This familiarity plays a crucial role when navigating the river section of the Coast to Coast race.
Additionally, having your kayak readily available allows for spontaneous training sessions, adding flexibility to your schedule.
Many beginners make the mistake of assuming that a faster kayak will automatically lead to quicker race times.
In this section, I’ll discuss the concept of the faster boat fallacy and why it is essential that you choose a forgiving kayak that matches your current skill level.
By understanding the importance of stability and building confidence, you'll lay the foundation for long-term success in your kayaking journey.
It's easy to fall into the trap of believing that a faster kayak will make you a faster paddler. While narrower kayaks have the potential to increase speed, they require greater skill and balance to handle.
On the other hand, wider kayaks offer stability and forgiveness, allowing you to focus on building essential paddling skills. Remember, it's not just the boat that determines speed, but how well you paddle and navigate the river.
Staying in your kayak and maintaining control during your first Coast to Coast race should be your primary goal. Opting for a forgiving kayak that offers stability and forgiveness allows you to navigate the river's varying features with confidence.
Choosing a wider kayak will provide better stability, making it easier to recover from mistakes and stay upright in challenging river features.
This not only builds your confidence but also reduces the risk of injuring yourself and damaging your equipment.
As a beginner, it's crucial to prioritise efficiency, technique, and building a strong foundation of paddling skills. Starting with a forgiving kayak allows you to focus on mastering proper technique, maintaining balance, and navigating river features effectively.
By developing these fundamental skills, you'll build confidence and create good habits that will benefit you throughout your kayaking career. Only once you've gained proficiency should you consider transitioning to a narrower, more advanced kayak.
Choosing a forgiving kayak for your initial training stages doesn't mean you can't progress to a more advanced boat in the future.
Starting with a forgiving kayak is a strategic decision that sets you up for long-term success. It helps you establish a solid paddling foundation, develop river-reading skills, and build the necessary muscle memory.
As your skills improve, you can gradually transition to a narrower kayak when you feel ready to handle the added challenge.
When selecting your first kayak, there are four main features you should consider.
As I mentioned earlier, stability should be a top priority when choosing a kayak.
As a beginner, you want a kayak that is forgiving and requires minimal effort to balance. Balancing the kayak can distract you from focusing on essential aspects such as navigation and line selection.
A stable kayak allows you to navigate the river's features with greater ease and confidence, reducing the risk of tipping over and increasing your overall enjoyment.
Manoeuvrability is crucial in river kayaking, especially when you need to make quick decisions while moving downstream.
Shorter kayaks are generally more manoeuvrable than longer boats, as they respond faster to your paddle strokes and rudder inputs.
Being able to make precise turns and adjustments will enhance your ability to find the best line and optimise your performance on the river.
Different kayak models are designed to accommodate specific weight ranges. Selecting a kayak of the appropriate size is essential for optimal performance.
If you are too heavy for the kayak, it will feel unstable when you need to lean it to one side for side currents and boils.
Conversely, if you are too light for the kayak, it may sit too high in the water, reducing primary stability and making it challenging to control in strong winds.
Finding the right size kayak for you will provide the stability and responsiveness you need for a comfortable and safe paddling experience.
Because your first kayak may not be the one you end up racing with, choosing a kayak that has good resell value is a smart decision.
Opt for a well-known and respected brand with a solid reputation in the kayaking community. Avoid unusual or niche designs that may limit the pool of potential buyers.
By selecting a quality kayak that retains its value, you have the option to sell it in the future, either to upgrade to a more advanced model or to pass it on to another kayaker who is just starting their journey.
To help you choose your first multisport kayak as a beginner training for the Coast to Coast, I have selected three of my favourite options based on your weight category:
Width: 60 cm
Length: 4.9 m
Weight: 17 kg
Material: Plastic
Style: Sea Kayak
This kayak is a very safe choice for beginner multisport paddlers between 70–90 kg doing their first Coast to Coast race. With its forgiving hull shape and excellent manoeuvrability, it provides exceptional stability and allows for quick adjustments while navigating rapids.
Many Coast to Coast paddlers choose a Barracuda Beachcomber for their first boat. It is extremely popular for good reason and is a solid option you really can’t go wrong with.
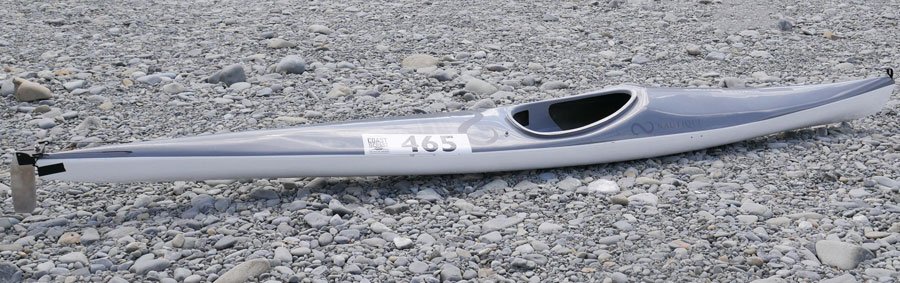
Nautique Reliance (Sisson Eliminator)
Width: 55 cm
Length: 4.9 m
Weight: 13.5 kg
Material: Composite
Style: Race Specific
For lighter paddlers under 70 kg, this boat offers excellent stability while still providing responsiveness.
If you primarily train in the ocean, you may consider the Reliance Touring, a sea kayak variation of this model. Also note that the Nautique Reliance was previously known as the "Eliminator" by Sisson Kayaks, so you might find second-hand options under the older name.
Ruahine Whio
Width: 62 cm
Length: 5.2 m
Weight: Unknown
Material: Composite
Style: Sea Kayak
As a larger paddler, the options for a forgiving beginner multisport kayak are limited. However, the Ruahine Whio is a suitable choice for those above 90 kg.
This kayak offers increased width and length to accommodate a higher centre of gravity and provide ample buoyancy.
The Whio's sea kayak design makes it well-suited for both ocean training and Coast to Coast racing. If your weight is around 100 kg or above, I’d highly recommend investing in a new Whio.
To hear my in-depth discussion around this topic, including my thoughts on other kayak models, and how to go about finding your perfect boat, then listen to the audio episode. You can click play above, or you can follow The Canterbury Kayaking Podcast and listen on your smartphone.
This is my guide to choosing the best paddle to start with if you are a beginner multi-sport paddler training for the Coast to Coast Race.
There are only 2 pieces of kayaking equipment that have a direct impact on your overall performance. Those 2 items are the kayak, and your paddle.
While choosing the right kayak is crucial for maintaining your balance and control, choosing the correct paddle will allow you to maintain your efficiency over the entire distance of the Coast to Coast race.
Choose the wrong paddle, and you’re going to be wasting both time and energy.
There are two main types of paddles: Flat-bladed paddles, and wing paddles.
Wing paddles feature a blade with a special shape designed to generate additional lift during your forward strokes.
When used with the correct technique, a properly sized wing paddle can improve your efficiency by around 4%.
While 4% may not sound like much, over the span of a 70-kilometre (5.5-hour race) this could mean finishing your paddle stage around 12 - 15 minutes sooner using a wing (compared with a flat paddle).
Because of this advantage, you will see nearly everyone using a wing paddle at the Coast to Coast race.
It is worth investing in a good wing paddle and developing your technique with it from an early stage.
Choosing the wrong blade size is the most common mistake I see with people's paddle choices.
Think of choosing your blade size like selecting your gear on a bike. Choosing the wrong gear is going to mean working a lot harder than you need to!
A larger blade has the potential to generate more power. However, it is going to require a lot more energy (muscle power) to complete each stroke. If you are using a blade that is too large for you, then you will not be able to maintain a high enough “stroke rate” (tempo) to be efficient. The muscles in your arms will burn and you will be slow through the water.
A smaller blade is the exact opposite. It will generate less power with each stroke, but it will require less energy to complete each stroke. This means your stroke rate will be higher, and it will be easier to maintain over a long distance. The only downside is a lower top speed.
When considering your blade size, it’s important to factor in 3 variables:
The length of your race.
Your fitness/ability.
The model of kayak you are in.
At 70 kilometres, the Coast to Coast race includes an exceptionally long paddle stage. Because of this, most (smart) paddlers choose a very small paddle blade. This is so they can maintain their stroke rate for the entire distance. Also, consider the fact that you will be fatigued from the bike stage and mountain run, and it makes total sense to size down your blades.
This one is simple. Pulling on a larger blade requires you to apply more force. If you’re just starting out with paddling, your paddling strength is going to be limited, and your technique is going to need development. Therefore, choosing a smaller blade is going to make paddling a lot easier for you at this stage.
If you are a beginner, then the chances are you are going to be (or should be) paddling a stable multisport kayak. Models of kayaks in the stable category are wider than the more advanced boats. This additional width is great for forgiveness in the river but creates more drag through the water.
Just like riding your bike up an incline, you need to match your gearing with the amount of resistance you are trying to overcome. Therefore, you will want to “gear down” to match your kayak's lower top speed.
The Ideal Blade Size for a Beginner = As Small as Possible!
Considering the factors above, it should now be clear that you will want your first multisport paddle for the Coast to Coast to have very small blades.
A great example would be the Gara Odin XS blades:
Blade Length: 472 mm
Blade Width: 159 mm
Blade Area: 675 cm2
A little extra blade size makes a big difference! The Gara Odin S is an example of the size of blade an elite-level male might use, in the fastest kayak, in an attempt to win the Coast to Coast:
Blade Length: 478 mm
Blade Width: 170 mm
Blade Area: 740 cm2
As a novice paddler, you’d be mad to use blades larger than the Gara Odin S for the Coast to Coast race!
Most premium multisport paddles that are designed for the river, feature re-enforced tips in the end of the blades.
The idea behind this is to reduce the wear on the blades when paddling in shallow rivers like the Waimakariri.
Wing paddles designed for surf-ski or ocean paddling may not have any re-enforcing in the tips at all. If you use a paddle like this on the Waimakariri River, the blades can wear down very quickly - or even break!
Paddles that feature metal tips (stainless steel) can reduce blade wear when you scrape on rocks. However, big strikes have the potential to bend the metal tips beyond repair. Metal-tipped paddles are thought of as lasting slightly longer, but add noticeable weight to the blades.
Bi-axle fibreglass tips wear slightly faster than metal tips, but stand a better chance of survival during strong whacks. In general, bi-axle fibreglass tips are normally found in lighter paddles. This is the main reason many people prefer them, as the blades are lighter to swing around for 5+ hours.
When choosing a paddle, the main thing is that you choose a wing paddle with the correct sized blades in the correct length. I would recommend some form of tip re-enforcement, but the type of re-enforcement is personal preference and doesn’t matter all that much.
While a fixed-length paddle is going to be slightly lighter than an adjustable one, an adjustable shaft is desirable for most paddlers.
Being able to tinker with your paddle length through a 10 cm range is great. You probably do not yet know exactly what length paddle you want to race with, and your preferred paddle length will change as you progress in the sport.
Having an adjustable shaft makes changing your paddle's length super easy.
Adjustable paddles also let you to change the feather (offset) of your blades. If you are not sure what angle of offset to set your new paddle, I would recommend you start with 60 degrees.
With these things in mind, I would 100% recommend your first paddle be adjustable.
In order to create a comfortable and powerful paddling stroke, you need your paddle to be set to the correct length for your height.
If you are looking to purchase a paddle now, then you can simply buy an adjustable paddle based on your height using the chart below.
Your Height (cm) |
Your Height (in) |
Paddle Length |
142 – 157 cm |
4'8" – 5'2" |
200 – 210 cm |
157 – 172 cm |
5'2" – 5'8" |
200 – 210 cm or 205 – 210 cm |
172 – 183 cm |
5'8" – 6' |
205 – 215 cm |
183 – 190 cm |
6' – 6'3" |
205 – 215 cm or 210 – 220 cm |
190 cm + |
6'3" + |
210 – 220 cm |
If you’re looking for a really good wing paddle to start with, I can 100% recommend the Gara Odin XS.
Blade Length: 472 mm
Blade Width: 159 mm
Blade Area: 675 cm2
Total Paddle Weight (Adjustable): 630 g
Blade Tips: Bi-axle fibreglass re-enforcement
Shaft Flex: 40:60 carbon/fibreglass
This is the smallest blade size in the Gara Paddles range. It suits paddlers who are expecting to race the Coast to Coast kayak stage in over 5 hours, are still developing their paddling fitness, and will be paddling a stable to intermediate boat.
Choose the correct length for your height using the chart above, and you’ll great paddle for maximum efficiency on the river.
To hear my in-depth discussion around this topic, including my thoughts on shaft flex, then listen to the audio episode. You can click play above, or you can follow The Canterbury Kayaking Podcast and listen on your smartphone.
Here is how to choose a kayaking PFD (lifejacket) for multi-sport paddling and competing in Coast to Coast race.
Once you have your own kayak and paddle, then you probably can’t wait to get out on the water and start training. But in order to do that safely, you will need a PFD (personal floatation device).
When comes time to hit the river, your PFD will become your most important piece of safety gear. If you come out of your kayak in a rapid, it is essential that your PFD is the correct type, fits you well, and is in good enough condition to do it’s job: keep your head above the water!
If you make a poor choice in PFD (like one with no hydration pouch) then you are going to be dying of thirst during the Coast to Coast race and your performance will suffer.
If you buy the wrong type of PFD completely, then it may not even be race compliant. This means all your hard work and training will come to nothing because you will not be allowed on the river at Coast to Coast.
Just to let you know, the 3 models of PFDs I recommend in this article are all ones we sell. That means if you choose to buy from us, you’ll be supporting our kayak school. Don’t worry; I'm always honest, open, and try to be impartial with my suggestions – I only recommend the good stuff.
As a beginner you should be wearing your PFD every time you are in your kayak!
You may see some experienced paddlers choosing not to wear their PFDs when training in Christchurch city, where you are only 10 metres from the bank if you fall out. But paddling without a PFD on really isn’t that cool.
If you are training for the Coast to Coast race, I suggest you get used to padding in your PFD as much as possible. You are going to race wearing it, and smart athletes train how they intend to race.
Whenever you are paddling on a flowing river, ocean, or deep lake, then you should be wearing your PFD 100% of the time. Regardless of how good you are at swimming.
As a river kayaker, you will need a river-specific kayaking PFD.
River-specific kayaking PFDs are designed for swimming in rapids and whitewater. They are low profile, fit snug around your ribs, and allow you to actively swim to safety while wearing it.
General purpose lifejackets and designed for general purpose boating and water activities in lakes and oceans. General purpose PFDs are bulky, have additional padding to support your head, and are designed so you can lay on your back and float for hours while waiting for rescue. General purpose PFDs are NOT suitable for river kayaking.
Prior to you getting on the river at Coast to Coast, your kayaking equipment will be checked by officials.
If your PFD does not meet the Coast to Coast's specific safety requirements, you will not be allowed to race. It is as simple as that!
I suggest checking the Coast to Coast website to double check your model of PFD meets the current rules and has the correct standard (rating). Some surf-ski specific PFDs do not meet these standards, so beware!
In addition to meeting the correct standard, your PFD will be visually inspected by race officials for:
A webbing (not string or elastic) bottom cinch strap - as found on most modern river PFDs.
No damage to straps, fabric, or buoyancy foam.
No significant sun/mould damage.
Your multisport kayaking PFD should fit snug around your waist, with the bottom cinch strap tightened just under your ribcage.
If your shoulder straps are too tight, you may not be able to get your PFD into the correct position on your torso. So start with all the straps loose, and begin tightening from the bottom. Work your way up, and finish by taking the slack out of your shoulder straps - don’t over tighten your should straps!
Not all PFDs fit the same. It can be worth trying on a few different styles in different sizes to find a PFD that fits you best. This is particularly important if you are not a model athlete with a slim waist.
To check your PFD is fitting you correctly, have a friend pull up on your shoulder straps while you are wearing it. Your friend should not be able to pull your PFD off you, and should feel like the PFD has a good grip on your torso. If the PFD slides up your torso easily, adjust the fit, or try a different model.
Front-zip PFDs are the easiest to get in and out of. They fit all body shapes and are a great option.
The down-side of having a zip in the centre of the PFD is that this zip takes up valuable space which could otherwise accomodate a drink bottle pocket and hydration tube holster.
Side-entry PFDs are the fastest to get on and off during a multisport race transition.
Because there is no zipper on the front, there is space for an additional drink bottle pocket, and foam block for holding your hydration tubes.
Some people don’t like side-entry PFDs because they can be difficult to get a good fit. You need to adjust each side independently, and this can lead to the PFD fitting off-centre on your torso.
Having a friend help you adjust the straps is usually needed - unless you don’t mind taking it on and off 10 times in order to adjust on your own. But once you have it dialled in right, you shouldn’t need to touch it again.
Over-the-head style PFDs can be a little tougher to wriggle into (particularly if you have very large shoulders, or breasts) but are very comfy once they are on.
They have no buckles. You start with it loose every time, slip into it, tighten up the sides, and you are good to go.
They have no zipper on the front, so there is ample room for a drink bottle pocket, and a hydration tube holster.
Because over-the-head PFDs are a little awkward to wriggle into, they can be less likely to come off during a swim down a rapid - or so the theory goes.
Regardless what model of PFD you choose, you want to ensure it has a couple of things:
A large pouch in the back for holding a 2 L hydration bladder
Additional pockets for holding a survival bag and snacks.
These are the 3 best PFDs for kayaking in the Coast to Coast race:
Entry Style: Side-entry
Size Options: One size fits most
Rear Hydration Pouch: Yes
Front Hydration Hose Holster: Yes (foam block)
Front Drink Bottle Pouch: Yes
Accessory Pockets: 2
Coast to Coast Race Compliant: Yes
The Rasdex Multisporter PFD is a popular option among serious multisport athletes. Once you have adjusted the straps to the correct length, this side-entry PFD is extremely fast to get on and off during race transitions.
It is fully featured with everything you need to race like a pro. So if you are after the raciest race PFD out, the Rasdex Multisporter is it.
Entry Style: Over-the-head
Size Options: One size fits most
Rear Hydration Pouch: Yes
Front Hydration Hose Holster: Yes (foam block)
Front Drink Bottle Pouch: Yes
Accessory Pockets: 2
Coast to Coast Race Compliant: Yes
The Day Two Adventure Racer PFD is a great choice for paddlers who prefer the over-the-head style of kayaking PFD.
Once you’ve wriggled your shoulders in, this PFD hugs your torso firmly and evenly. It’s so comfortable you will probably forget you are wearing it.
Entry Style: Front-zip
Size Options: 3 sizes (XS/S, M/L, XL/XXL)
Rear Hydration Pouch: Yes
Front Hydration Hose Holster: Yes (plastic clip)
Front Drink Bottle Pouch: No
Accessory Pockets: 2
Coast to Coast Race Compliant: Yes
The Palm Hydro PFD accommodates all body shapes better than any other PFD on the market. So if you are struggling to find a PFD that fits you properly, the Hydro will probably do the trick.
This PFD has all the essential features you will need for multisport racing, including a rear hydration pouch. So if you are looking for the best possible fit and a very safe feeling PFD, this is a fantastic choice.
To hear my in-depth discussion around this topic, including my thoughts on drink systems, then listen to the audio episode. You can click play above, or you can follow The Canterbury Kayaking Podcast and listen on your smartphone.
If you are serious about wanting to do the Coast to Coast Race within the next few years (or months) then you’ll want to get your Grade 2 Kayak Course booked as soon as possible. All competitors are required to have a grade 2 kayaking skills certificate to enter the race, so the sooner you can gain your certificate, the better.
As a kayak coach myself, you might expect me to suggest taking lessons from the very first time you sit in a kayak. But, I actually don’t think this is the best time to invest in lessons.
When you first sit in a kayak, you have a lot you can figure out on your own. Balance, steering with your rudder, paddling coordination, etc. Having an instructor in your ear from the very first moment you sit in a boat is actually not that helpful. It just clutters your brain and makes it hard to concentrate.
Instead, I suggest you spend your first couple of sessions with a friend, or at a kayak club. There is no need to take things too seriously at this stage or worry too much about your technique. You just need to get a feel for paddling, get relaxed, and enjoy it!
Once you feel relaxed and comfortable paddling on flatwater, you are now ready to invest in some quality kayaking lessons. And if you plan to do the Coast to Coast race, then your Grade 2 Certificate Course is the best place to receive your first professional kayaking lessons.
While you might feel like delaying your Grade 2 Certificate Course in order to get more preparation time on flatwater, in my experience, this will NOT help you much.
Aside from getting comfortable sitting in a boat and using a paddle, there isn’t a lot you can do on flatwater that will have a significant impact on your performance during your course.
What will actually help you, is ensuring you have plenty of time after your course to practice and work on everything you learned during your course lessons.
Plus, if you do not gain your certificate straight away, then having plenty of time left available before your Coast to Coast race means getting reassessed will not be a big deal.
If you delay your course to a later date, then you are simply reducing the amount of time that you can spend practising your river kayaking skills prior to the Coast to Coast race – and this is not what you need.
So, make sure to book in to do your Grade 2 Certificate Course as soon as possible!
Yes. Kayaking on grade 2 rivers is harder than most people expect. You are trying to learn a completely new set of skills, unlike any other sport. And once you learn the fundamentals, I guarantee you’ll want to learn more in order to feel fully confident at your first Coast to Coast race.
The Coast to Coast officially recommends first-time competitors budget for 6 days of professional instruction on grade 2 whitewater, plus a Guided Trip down the river prior to race weekend.
In my experience teaching hundreds of beginners, nearly everyone wants more lessons with me after their 4-day Grade 2 Certificate Course is complete.
You may only have a few months left to prepare for Coast to Coast, and taking more kayaking lessons guarantees you’ll be taught what you need to know, and will give you the best chance at maximising your investment in time and money.
At Canterbury Kayaking, we offer a 3-day Skills Improvement Course for people who have done their grade 2 kayak course and now want to develop their kayaking skills further. For the reasons I have talked about, this course is extremely popular.
For paddlers on a budget, I recommend skipping the flat water lessons before your grade 2 course and investing that money in more coaching after your grade 2 course.
There are a couple of things you can do as a learner to gain the most from your time and money invested in kayaking courses and lessons.
Great instruction is all about clear communication and having a good relationship between coach and athlete.
The first thing I suggest you do is turn up to your lesson with a good idea of why you are taking the course or lesson(s). Make sure you can clearly explain to your coach what you hope to learn or improve on, and what your long-term goals are.
Throughout a lesson, remember that your coach is a real person just like you. Appreciating why your coach does what they do can be helpful if you want to get the most out of your relationship with your coach.
Understand that nobody is getting rich from kayak coaching in New Zealand, it’s tough on our bodies and takes up most of our weekends. We do it because we love helping people achieve their dreams.
I personally get great energy and motivation from seeing my paddlers improve. But more importantly, I love seeing the positive impact this improvement has on my clients’ sense of accomplishment.
If I can see you are enjoying the learning process, are gaining satisfaction out of your improvement, and are getting closer to achieving your long-term goals, then I draw loads of energy from that.
So, think about how you can be a pleasure to teach, and your instructor will want to go the extra mile for you.
Lastly, be prepared to not be very good at river paddling straight away. Trust the learning process. You will improve!
In this guide, you will learn how to set up and adjust your multi-sport kayak and wing paddle.
If you don’t set your boat set up correctly, you are not going to be able to balance your kayak effectively and you may not be able to steer away from river-obstacles in time!
And if your paddle is set to the wrong length, or set to the wrong angle, you are not going to be able to paddle powerfully or efficiently - You will be slow!
Spending a little extra time ensuring you have the correct knee position, foot position, paddle angle, and paddle length is going to set you up for your best chance at success with kayaking.
Your knees should be bent and positioned out to the side (wider than your hips).
If you are in the correct position, your knees will touch the inside of your kayak. This leg position allows you to brace your knees inside your kayak for balance when going through rapids.
Being able to brace your knees like this, will also make it easier to lean (edge) your kayak away from side-currents in the river.
Failing to edge at the correct moments is the single biggest cause of capsizes on grade 2 rivers. So you definitely want to ensure your knees are in a good position for bracing!
More advanced paddlers may choose to have their knees positioned a little closer together. This makes it easier to generate power from your legs during forwards strokes.
As a beginner, your number 1 priority should be stability - and avoiding a swim! So set your knees wide, and have them ready to brace against the inside of your boat.
Ensure your pedals are close enough so that you can steer in both directions while your knees are braced to the sides.
If you have to straighten your legs (or drop your knees away from inside of your boat) in order to operate your foot pedals, then your pedals are too far away – so move them closer to your seat.
If your knees are being forced into the sides of the boat without any wiggle room at all, then try moving your foot pedals one notch away for improved comfort and forward stroke performance.
Barracuda Kayaks have self-adjusting rudder-lines. So you can simply move the foot pedals to the correct position without the need to re-tension the lines that connect your pedals to the rudder.
Most other brands of multisport kayaks require that you re-tension the rudder-lines each time your move the foot pedals to a new position.
Look for 2 adjustment straps inside your cockpit attached to the foot pedals. Each foot pedal has its own adjustment strap. Loosen these 2 straps.
Move your foot pedals to the desired position.
Have another person (at the back your boat) hold your rudder exactly straight.
While your rudder is being held straight, re-tighten the adjustment straps so that there is no slack in the rudder-lines.
Use the adjustment straps to fine tune your steering. Ensure the flaps of your pedals are in a vertical position, or slightly angled towards your seat.
With another person holding your rudder off the ground, sit your kayak and test your steering with your feet.
Re-adjust the tension as required until you have even steering left and right.
I suggest you learn how to fine-tune your rudder-lines while sitting in your kayak on the water. This is an extremely valuable skill to develop. You don’t want to waste time getting out of your kayak each time you need to make a minor adjustment to your kayak’s steering system - especially during a race!
Your hips should fill the entire width of your kayak seat, without being uncomfortably tight.
The more space you have between your hips and the sides of your seat, the more sloppy you are going to feel in your boat - particularly once you are paddling down rapids.
If you have excess space at your hips, pad this area out with closed-cell foam. This will dramatically increase your ability to balance your boat using your hips.
If you have narrow hips and paddle a Barracuda kayak, we highly recommend purchasing and installing a pair of Rasdex Hip Pads. These are adjustable, so you can customise the thickness of the pads very easily.
If you only have a small amount of space at your hips you to pad, then you can simply duct tape a closed-cell foam pad into the side of the seat. A $20 camping mat for your local hardware store is a great source of closed-cell foam.
60 degrees of paddle angle is what most multisport paddlers use. So I suggest you start with 60 degrees.
Most adjustable wing paddles have an adjustment dial in the centre of the shaft, so you can select 60 degrees easily.
Just make sure that if you intend to paddle right-handed (naturally right-handed people tend to paddle right-handed) that you set up your paddle to 60 degrees in the RIGHT-HANDED configuration!
To check you have your paddle set up right-handed, hold your paddle in front of you with your right blade’s power-face facing you. In this position, your left blade’s power-face should be aiming up towards the sky (at 60 degrees). If your left blade’s power-face in pointing down toward the ground, your paddle is set up left-handed and you may want to change it.
You want to have about 16 centimetres of space from your hands, to the start of your paddle blades.
Use a tape-measure to find 16 centimetres from the power-face of each blades.
Mark this position at both ends, by wrapping insulation tape around your paddle shaft.
Grip your paddle shaft, insuring your hands are on the inside of the tape.
Mark the inside position of your hands using insulation tape.
Measure again. Double-check you have your wraps of tape 16 centimetres from the blades - and that both ends are even!
Paddle with your hands in between the tape.
Tip: Some people like to wrap the tape many times around the shaft, creating thick bumps either side of their hands. This can physically prevent your hands from sliding around on your shaft.
Ensure you have chosen a paddle that is roughly the right length for you based on your height. Read the article: Buying Your First Paddle for the Coast to Coast Race
Once you have your hands positioned about 16 centimetres from your blades (as described above), move the adjuster in the centre of your paddle shaft so that your hands can be about the width of a push-up position (or bench-press).
This grip-width should put you close to your most naturally strong position.
Once you have kayaked with your paddle at this length for a couple of sessions, experiment with slightly different lengths (adjustments of around 2 centimetres will create a noticeable difference).
Make note of how different length settings affects your comfort and performance.
It can take several months of fine-tuning to find your optimal paddle length. So don’t stress about it too much during the early stages. Just ensure you have your paddle set up “about right” so it feels comfortable for you to use.
Having the correct kayak and paddle setup is vitally important for your comfort, safety, and performance. So take the time to get it right.
Your knees should be in a bent and wide position. You should be able to brace your legs against your boat for balance.
Your foot pedals should be positioned at a length that you can steer with your rudder in both directions while your knees are braced in your kayak.
Check the tension in your rudder-lines and adjust as necessary. You want both pedal flaps vertical when your rudder is straight.
If you have excess space at your hips, pad out the area in between your hips and the side of your seat. If you are uncomfortably tight at your hips, consider installing a wider seat.
Set your paddle angle to 60 degrees. Check this is set to the right-handed position (if you intend on paddling right-handed).
Grip your paddle shaft with 16 centremetres of space between your hands and the power-face of your paddle blades. Use insulation tape to mark this position.
Adjust your paddle length so that your grip width is similar to that of a strong push-up or bench-press.
Don't be afraid to play around and adjust things. Find a position that feels good to you!
To hear my in-depth discussion around this topic, including detailed instructions on how to set your kayak up correctly, then listen to the audio episode. You can click play above, or you can follow The Canterbury Kayaking Podcast and listen on your smartphone.
Here are the 5 basic skills that every multi-sport kayaker should learn first.
I know you're excited to start kayaking, but you need to get the basics right first in order to experience long-term success with paddling.
Imagine trying to get into your kayak for the first time. You fall into the water and get totally soaked. Now you're cold, embarrassed, and demoralised.
Once you do finally get paddling, your back starts to ache and you wonder why your paddling feels wonky. One side feels good, but the other side feels wobbly and weak.
You struggle to steer the boat where you want to go, and without warning you fall into the water again.
It is then that you realise you've made some terrible mistakes. You are unable to get yourself to shore, and it's starting to get dark!
The following 5 tips will ensure that your first kayak training sessions are a positive, safe, and productive experience...
Falling out of your kayak before you have even set off can be embarrassing, demoralising, and is a waste of your valuable training time.
To ensure you stay dry while getting into your multisport kayak, follow these easy steps:
Position your kayak side-on (parallel) to the bank.
Position yourself between the bank and your kayak.
Hold your paddle behind your body, with the paddle shaft at 90 degrees to the kayak and bank (you will use the paddle as a brace between the bank and your kayak).
Position one paddle blade power-face-down on the bank.
Place the opposite end of your paddle just behind the cockpit (seat area) of your kayak.
Place the hand that is closest to the bank about mid-way on your paddle shaft.
Use the hand farthest from the bank to grip both your paddle shaft and the cockpit rim (your fingers will be inside the boat, and your thumb will be wrapped around the paddle shaft).
Sit down on the back edge of your cockpit (just in front of your paddle), keeping your weight slightly towards the bank.
Carefully step your feet into your kayak.
Straighten your legs, then slip your knees and hips inside the kayak so you are sitting in your kayak balanced and ready to paddle away.
Getting your paddling posture right from an early stage is essential.
You'll want to get used to sitting in your kayak in the correct position, so as your technique improves, you are already sitting in a powerful position.
To ensure you are in the correct paddling position, follow these tips:
Your knees should be bent.
Sit tall in your kayak, with a neutral spine position (not hunched forward, or slouched back).
Bend at your hips so your shoulders are directly above your hips (90-degree bend at your hips).
Keep your chin up.
Pull your shoulders back, by trying to squeeze your shoulder blades together.
If you have chosen the correct type of paddle, and have set this up correctly, then your paddle blades will be at different angles to each other.
Because of the angle difference (offset), you will need to "feather" your paddle and you take each stroke.
When you feather your paddle correctly, your blades will be aligned in the correct direction when they meet the water.
If you fail to feather your paddle correctly, your blades will be poorly aligned in the water, which will lead to a drastic loss in performance and reduced balance in your kayak.
Here is how to feather your kayak paddle correctly (written for a right-handed paddler):
Understand that the goal of feathering is to ensure that with every forward stroke, the power-face of your paddle blades are aiming directly backwards (from your direction of travel) while in the water.
Grip your right hand on the paddle shaft, near the right blade, so that when you take a right forward-stroke your power-face points directly backwards, and your right wrist is straight.
Imagine your right hand is stuck to your paddle shaft with super-glue (your right hand NEVER moves from this position).
Hold the paddle shaft in your left hand LOOSELY, near the left blade.
In between each and every stroke allow the paddle shaft to rotate (slip) in your left hand.
Take particular care to ensure that when you place the left blade in the water, the power-face is aiming directly backwards before you re-grip your left hand and take your stroke.
Using your rudder is going to be one of your primary methods for steering your multisport kayak when you get on the river.
When you go to the river for the first time, you do NOT want to be thinking about your feet!
You want steering with your rudder pedals to feel like second nature - just like driving a car.
This way, when you start paddling on the river, you can focus all your attention on where you want to go, not how to operate your pedals.
Here is how to use your rudder pedals correctly:
Ensure your pedals are set up correctly.
Understand how your pedals work. Take a look inside your boat and notice that you have a solid foot-plate, and a flap above the foot-plate with a line (string) that connects the flap to your rudder.
To turn left, use your left foot to push the left flap forward.
To turn right, use your right foot push the right flap forward.
Ideally, you should have the balls of your feet on the solid foot-plate, and your toes on the flaps.
Remember to relax the foot you are not pushing on, so you don't bind up the system.
Don't just paddle in a straight line!
While training on flat-water, practice drills that require plenty of steering. Go around obstacles, follow the curvature of the shore-line, or zig-zag back and forth.
If you can train your brain to steer your kayak using your rudder, you will be able to confidently manoeuvre your kayak when it comes time to paddle down the river.
Every kayaker falls out of their kayak from time-to-time. It's part of our sport, so try not be too embarrassed or upset.
If you do fall out of your kayak during a flat-water training session, here is what you need to do to ensure you stay safe:
Before you fall out of your kayak:
Wear a properly fitting PFD (life jacket) 100% of the time.
Don't kayak alone. It's best if you have another paddler around who can help you get to shore.
If you must kayak alone, keep really close to the shore.
Carry waterproof communication (like a cell phone in a sealed pouch) in an easy-to-reach place ON YOUR BODY (not in the boat).
After you have fallen out of your kayak:
Keep hold of your kayak and paddle. If you did let go of these things when you fell over, swim after them!
Do NOT climb on top of your kayak. This will fill the kayak with water. Instead, float in your PFD.
Leave your kayak upside down. This traps air inside your boat and makes it easier to drag to shore.
Swim to the front of your kayak.
Find the grab handle at the front (nose) of your kayak.
Hold your paddle in the same hand as your kayak. This frees one arm for swimming.
Ensure your paddle is held parallel with your kayak for less resistance through the water.
Holding both your paddle and boat in one hand, swim to shore with one arm and two legs. Drag your kayak behind you as you swim.
To hear my in-depth discussion around this topic, including detailed instructions on how to practice these skills effectively, then listen to the audio episode. You can click play above, or you can follow The Canterbury Kayaking Podcast and listen on your smartphone.
Are you a beginner multi-sport kayaker looking to take your skills to the next level?
Joining a kayaking club can be the key to unlocking a world of opportunities for growth and enjoyment in your paddling journey.
In this guide, we'll explore the advantages of joining a kayaking club and provide valuable tips to help you make the most out of your club membership.
Whether you're a beginner multi-sport kayaker training for the Coast to Coast race or simply seeking a supportive community to enhance your kayaking experience, this guide is for you.
When it comes to progressing as a kayaker, there's no substitute for the benefits that a kayaking club can offer.
Let's delve into some of the advantages you can gain by becoming a member:
Kayaking clubs often provide access to a wide range of equipment, from kayaks and paddles to safety gear.
This can be particularly beneficial if you do not have your own kayak gear yet.
Being able to try different types of equipment can help you find what works best for you while you refine your skills.
Joining a kayaking club means gaining access to experienced instructors and fellow paddlers who can help you develop your kayaking skills.
Whether you're looking to improve your forward stroke technique or navigate challenging river features, the guidance and feedback from knowledgeable club members can make a significant difference in your progress.
Training to become a better paddler requires dedication and determination.
Being part of a kayaking club provides a supportive community of like-minded individuals who share a passion for paddling and can offer encouragement and motivation along the way.
Surrounding yourself with fellow kayakers who understand your goals can make your training journey more enjoyable and rewarding.
Kayaking clubs organise regular paddling sessions in various environments, such as lakes, rivers, and even coastal areas.
These sessions allow you to explore different water conditions and build your confidence and skills in diverse settings.
For multi-sport kayakers preparing for the Coast to Coast race, these opportunities to train in different environments can be invaluable in preparing for the challenges that lie ahead.
Now that you understand the benefits of joining a kayaking club, let's explore the different types of clubs you can consider.
K1 clubs are ideal for flat water training and developing your forward stroke technique.
They focus on improving speed and efficiency in calm water conditions, which can be beneficial for multi-sport kayakers aiming to enhance their flat water performance during the Coast to Coast race.
If you want to master the art of river paddling, joining a whitewater club is a great choice.
Whitewater clubs offer opportunities to explore rivers, navigate rapids, and develop your whitewater skills.
This type of club can be particularly valuable for multi-sport kayakers aiming to conquer the challenging river sections of the Coast to Coast race.
As a multi-sport kayaker preparing for the Coast to Coast race, joining a multi-sport club can be highly beneficial.
These clubs focus on racing and can provide valuable experience on grade one and grade two water, similar to what you'll encounter during the race.
You'll have the chance to train with fellow multi-sport athletes and learn strategies to optimise your performance.
For those without access to river kayaking, joining a SurfSki club can be a fantastic alternative.
SurfSkis are sit-on-top, fast kayaks designed for open water paddling and racing.
Joining a SurfSki club allows you to hone your paddling skills in a similar style to multi-sport racing kayaks, even if you don't have immediate access to rivers.
Once you've chosen a kayaking club that aligns with your goals and interests, it's essential to make the most of your membership.
Here are some tips to help you maximise your club experience:
Attend as many paddling sessions as possible.
This will allow you to gain more experience, refine your technique, and learn from others.
Interact with fellow club members, both on and off the water.
Attend club events, social gatherings, and training camps to build connections and foster a sense of community.
Offer your assistance for minor club roles or events.
Volunteering not only helps the club but also provides opportunities to learn new skills, develop leadership abilities, and deepen your involvement within the community.
Don't hesitate to ask for guidance or advice from experienced club members.
They have a wealth of knowledge and are often eager to help others improve.
As you gain experience and proficiency, be willing to lend a hand to fellow club members who may be starting their kayaking journey.
Sharing your knowledge and skills not only strengthens the club community but also reinforces your own understanding of paddling techniques.
Joining a kayaking club can open up a world of possibilities as you train for the Coast to Coast race.
The access to equipment, skill development opportunities, motivation, and a supportive community can propel your kayaking journey to new heights.
Evaluate the types of clubs available in your region, choose a couple of clubs that align with your goals, and apply the tips shared in this guide to make the most of your club membership.
Remember, kayaking is not just a sport but a way of life, and joining a kayaking club is a gateway to endless adventures and personal growth.
To hear my in-depth discussion around this topic, including my thoughts on specific kayak clubs in the Christchurch area, then listen to the audio episode. You can click play above, or you can follow The Canterbury Kayaking Podcast and listen on your smartphone.
Do you want to learn the multisport forward stroke technique? Want to feel confident you are focussing on the right things?
In this article, you’ll learn the details of a good multisport forward stroke technique with a wing paddle.
When it comes to the forward stroke technique, one crucial element to pay attention to is the angle of your blade.
The power face of your paddle refers to the side you pull through the water, which has a scoop shape to it. It's essential to ensure that the power face is pointing directly backward from your line of travel. This alignment allows for a stable grip on the water and maximises the lift that the wing can provide.
Many beginners tend to have an "open" blade face, where the power face points away from the kayak too much. To rectify this, I recommend changing your grip or rolling your wrists back slightly, to set the blade angle more closed. I find it beneficial for beginners to start with a slightly closed blade angle, approximately 10 degrees angled towards the kayak.
By angling the power face slightly inwards, you'll experience the full effect of the wing when pulling on your stroke. This adjustment ensures a secure grip and delivers power through the paddle into the water in a stable manner.
Finding the optimal blade angle may take some practice, but paying attention to this aspect will significantly improve your forward stroke technique.
The catch refers to the initial phase of the stroke, where you place the paddle in the water before commencing the pull. This phase sets the foundation for a powerful and efficient stroke, making it essential to pay attention to the quality of your catch.
When executing the catch, it is vital to ensure that the entire blade enters the water right from the start. This requires you to make a deliberate motion of "stabbing" the water with the paddle. By immersing the entire blade, you maximise the surface area in contact with the water, enabling you to generate more power.
By getting the whole blade in the water early on, you can capitalise on the full potential of your stroke, optimising power transfer from paddle to water.
Achieving an optimal catch location will greatly enhance the effectiveness of your stroke.
To begin, ensure that you are reaching the paddle blade as far forward as possible without compromising your posture. Maintain an upright sitting position, leaning slightly forward, but avoid hunching or leaning over the spray skirt. By sitting tall, you maintain a strong physical foundation for the stroke.
Reaching the blade forward accomplishes two important objectives. Firstly, it extends your lower arm, allowing for greater power potential. Secondly, it promotes torso rotation, which further amplifies the strength behind your stroke. This combination of extended lower arm and rotational force positions you for a powerful pull.
By reaching the blade all the way forward, you achieve a longer and more impactful stroke. This lengthier stroke produces more significant results with each repetition. Conversely, if you fail to reach forward, your stroke will be shorter, resulting in reduced efficiency and effectiveness. To compensate, you may end up pulling the stroke too far back, which compromises your stability and strength.
In addition to reaching forward, focus on keeping the catch close to the kayak. Emphasise proximity to the boat, even to the point of occasionally making contact. When I instruct my clients I sometimes ask them to intentionally hit their kayak with their paddle, as it ensures they are getting the catch as close as possible.
To summarise, achieving an ideal catch location involves reaching the blade forward and placing the paddle in the water in close proximity to the boat.
Once you have set your blade in the water, the next crucial step is to initiate the pull. How you execute this phase is of utmost importance. While arm strength plays a role, the primary source of power comes from rotation. Understanding the significance of leg drive and torso rotation in the forward stroke technique is key to generating efficient power.
When you take a stroke, try to engage your entire body. Start by pushing against your footplate with the foot on the same side as the stroke you are taking. For example, if you are performing a left stroke, push against the left footplate. By doing so, you straighten your left leg and push your left hip back in your seat.
As your hips turn in your seat, it becomes easier to rotate your torso. Remember, your arms are connected to your torso, and by moving your torso, you are effectively moving the paddle. This integration of leg drive, hip rotation, and torso rotation allows for a more powerful stroke, utilising larger muscle groups rather than relying solely on the smaller muscles in your arms.
Twisting through your torso requires some flexibility. The more you can rotate through your waist, the greater energy you can deliver into the paddle without solely relying on your arm muscles. However, it's important to acknowledge that not everyone has the same level of flexibility or body type, and attempting to rotate excessively can be frustrating or even impossible for some.
Instead of solely focusing on rotating more, I find it more effective to concentrate on timing your rotation correctly. Especially if you have limited rotational flexibility, ensuring you initiate rotation at the right moment becomes crucial. This moment occurs just after you have completed the catch phase of the stroke. Once you have achieved the correct blade angle, a full catch close to the boat, and well forward, you can then activate your legs, hips, waist, and shoulders. This coordinated rotation and engagement should occur only after the blade is fully immersed in the water.
Many paddlers become fixated on rotating more without considering the timing of their rotation. It is more important to avoid prematurely rotating before the blade is in the water. Focus on synchronising your rotation with the catch, optimising the transfer of energy from your body to the paddle.
Imagine you are an archer about to shoot a bow and arrow. The pushing hand for your forward stroke should start in a position similar to the hand holding your imaginary bowstring taught.
Adjust your hands slightly from the bow and arrow position by setting your pushing hand at about forehead height, with about a 90-degree bend in that same elbow. While this is no longer the perfect position for aiming your bow and arrow, it’s a great position for pushing forward into your paddle shaft with your chest muscles.
As you take your stroke your pushing hand should extend forward as you straighten your elbow. Your pushing hand should remain high throughout the stroke, moving from forehead height to chin height by the end. Due to your hip and torso rotation, your pushing arm should travel across the centre line of your boat.
The hand of your pulling arm should start close to the boat and move outward away from the kayak throughout the stroke as you pull the boat past the blade in the water.
Both hands should move together. When teaching the forward stroke, I often utilise a front-facing camera angle to assess hand movement. When I analyse this footage with my clients, I like to draw the hand path on the screen. When the technique is correct, we see two parallel lines, parallel to the water’s surface.
Focus on maintaining a parallel path of your hands while keep the pushing hand high and travelling across in front of your eyes.
At this point, it's beneficial to find a position where you have fully unwound your torso in the direction of the stroke.
Ensure that your pushing hand has remained high. When you look straight ahead while paddling, your pushing hand should finish just below eye level, aligning with the horizon.
To release the paddle from the water, raise it only enough to remove the blade. Lifting it excessively high is unnecessary. Give your arm a brief moment of rest before engaging it for the next stroke.
As for the position of your arms, the lower arm that just finished pulling on the stroke should have a slight bend of approximately 45 degrees at the elbow. The pushing arm in front of you should be nearly straight, although not locked at the elbow.
By focusing on achieving a proper release position, you optimise the efficiency of your stroke while creating a smooth transition between strokes.
To hear my in-depth discussion on the forward stroke technique, including my advice on how to practice and improve your own stroke, then listen to The Canterbury Kayaking Podcast Episode 8 below or watch it on YouTube
Do you want to improve your boat handling skills? Want to ensure you have full control over your multisport kayak on your next river run?
In this article, you’ll learn essential boat-handling skills that you can practice during your next flatwater training session.
When it comes to improving your kayaking skills, dedicating time to flatwater drills is key, especially in the early stages of your kayaking journey.
While fitness and endurance are important, focusing on boat handling skills during your flatwater sessions can make a significant difference in your performance on the river.
Firstly, mastering boat handling skills ensures that you have control over your kayak. When you encounter obstacles or tight braids (where the river splits into multiple channels), being able to maneuver your kayak efficiently and accurately is vital to avoid collisions and navigate the river safely.
Secondly, developing your boat handling skills allows you to conserve energy and time. By having control over your kayak, you can position yourself optimally in the flow and avoid unnecessary movements or energy expenditure.
Now, let's dive into the first set of drills you can do on flatwater, that will help improve your steering and turning abilities.
One of the first drills I would recommend you focus on during your flatwater sessions is developing a feel for the rudder. Here's how you can do it:
Begin by getting your boat moving on the water. You don't need to go too fast—just a comfortable cruising speed will do.
Practice steering to the left and right using only your rudder pedals. This simple exercise helps you understand how much pressure to apply to make your kayak turn.
While performing this drill, maintain a steady rhythm with your paddling strokes. It's common for beginners to inadvertently change their paddling technique when using the rudder pedals.
Remember, in multisport kayaking, you want to maintain a smooth and efficient paddling rhythm.
The faster your boat's speed, the more bite the rudder will have. Conversely, if you have no speed or are stationary, the rudder won't have much effect on your kayak's direction at all.
It's essential to grasp this concept for future river runs. Beginners often mistakenly assume they have enough speed when they're moving with the river's current.
However, if you're merely floating along with the same speed as the river, your boat speed or hull speed is essentially zero.
In such cases, the rudder won't be very effective. Understanding that more speed allows the rudder to work better is crucial.
To further enhance your rudder skills, it's time to add more speed and power to your strokes. Here's the drill:
Increase your paddling intensity by digging in with stronger strokes on both sides. Put more effort into each stroke, generating more speed and momentum.
Simultaneously, apply stronger pressure to the rudder pedals. Crank the rudder on with determination, feeling the increased effect it has on your kayak's maneuverability.
By combining powerful paddling strokes with a firm application of the rudder, you'll experience a heightened sense of control and responsiveness.
Practising this drill on flatwater enables you to develop a stronger connection between your paddle strokes and the rudder, enhancing your overall boat handling abilities.
Now, let's explore a technique called bilge steering, which can take your steering skills to the next level, and may simultaneously blow your mind.
Bilge steering allows you to create even tighter turns by lifting one side of your kayak. Here's how you can practice it:
Begin by starting with no speed at all.
Lift one edge of your kayak by using your hips and knees to shift your weight. Let's say we want to turn left, so raise the left side of your kayak. Use your left knee to pull that side up while keeping your weight on the right hip.
Once you're stable on this edge, apply the rudder on the same side. In this case, use your left foot to apply some rudder input.
Maintain the lifted edge and the rudder position as you slowly start paddling forward.
This technique, also known as the off-edge turn, allows you to make the boat turn on a tighter radius.
Once you feel comfortable with one side, switch sides and repeat the process. Practice this technique repeatedly until you become more confident and familiar with it.
It's important to note that bilge steering may feel challenging and slightly off-balance at first. However, with practice and commitment to leaning toward the outside of the turn, you'll be able to execute tight circles with ease.
To further enhance your tight turns, add the sweep stroke.
The sweep stroke is a wider stroke that follows a semi-circular path. Here's how it works:
Unlike the forward stroke, which starts near your feet and pulls straight back, the sweep stroke begins near your pedals and moves out and away on a big wide semi-circle.
Extend your stroke all the way to the tail of your kayak. Turn your torso with the paddle and create a sweeping C-shape.
The sweep stroke generates more turning force through your paddle, allowing you to physically pull your kayak around. By incorporating this stroke, you can achieve even faster and tighter turns.
For the quickest turn, combine a pedal input and some speed to engage the rudder. Then, lift the inside edge of your kayak to add bilge steering and execute a sweep stroke on the outside.
During your flatwater practice, try to exaggerate these movements if you feel comfortable doing so. This will help you develop a strong sense of lifting the inside edge, using the rudder, and executing a sweep stroke.
While on the river, you may not feel comfortable lifting the maximum edge or leaning fully over to one side, but the exaggerated practice on flatwater will help you build confidence in your technique.
Soon, you'll be confidently executing tight turns and maneuvers with precision and control.
In your next flatwater session, I also want you to focus on developing the crucial skill of accelerating and slowing down.
You may wonder why this is important. Can't we simply maintain a steady pace from the top of the river all the way to the finish line?
Well, let me paint a clearer picture for you.
When you begin at Mount White Bridge on the Waimakariri River, you start with no speed and need to accelerate to get going.
Soon after, the river splits into two channels, requiring you to make a quick braid choice—left or right. Sometimes visibility might be limited, and you may need to slow down to ensure you make the right decision.
Once you've chosen the correct braid, you'll have to execute a swift turn using the maneuvering skills we discussed above. Then, you'll need to sprint into position before it's too late. Cruising at a steady pace may not be sufficient to reach the correct braid in time.
Furthermore, when encountering a turbulent “bluff corner”, you'll need to accelerate to get through that feature successfully. River paddling is a dynamic experience that requires skilful speed management.
Having the ability to accelerate into position is a significant advantage for paddlers who possess this ability.
Endurance is important, but river paddling is more of a stop-start, interval-like activity where you exert effort in bursts.
It's crucial to work on your acceleration ability.
Start by positioning yourself on the water without any initial speed, completely still.
Engaging in a sprinting exercise with a buddy can make it fun. Count down together and then race off the mark, aiming to accelerate as quickly as possible from a standing start to full speed.
Accelerating can be more challenging than it seems. Many paddlers initially struggle with maintaining their balance when attempting to paddle faster.
When sprinting, the only adjustment to your forward stroke technique should be in the length of your stroke.
Rather than taking a long stroke, focus on creating a shorter stroke. Avoid extending the paddle all the way to the seat. Shorten your stroke to go from your feet, to inline with your knees.
To increase your speed, you need to increase your stroke rate. Aim for shorter, faster strokes near the front of your boat. By halving the length of your stroke, you can potentially double your stroke rate, allowing for more strokes within the same timeframe and leading to better acceleration.
Keep your catch and other aspects of your technique consistent, such as torso rotation and keeping the pushing hand high.
Try a drill where you accelerate off the line, let the kayak slow down without coming to a complete stop, and then accelerate again with determination. Repeat this sequence several times, and you'll notice an increase in your heart rate, making it a great workout for strength and aerobic capacity.
Remember, by working on your fitness and skills simultaneously, you can make progress in both areas. So enjoy accelerating, keeping your kayak in motion, and building confidence for your next river trip.
Knowing how to stop quickly is an essential skill in kayaking. Here's how you can wipe off some speed efficiently and safely.
Imagine scenarios where you need to slow down urgently, like avoiding a collision with another paddler who has spun out ahead of you.
To hit the brakes effectively, you'll want to use the back of the paddle blade. Alternate sides quickly, using the back of the blade on both sides of the kayak.
A common mistake I see beginners making when asked to slow down is flipping their paddle upside down, changing their grip, and using the power face of the paddle to hit the brakes. This technique is unstable, and slow, and I do not recommend it for river paddling. Instead, keep your grip the same, and simply use the back of the blade to slow down or stop.
Practice hitting the brakes by using the back of your blade to bring your kayak to a quick stop. Focus on maintaining balance and control throughout the maneuver.
By mastering the skill of stopping in a hurry, you'll be better equipped to navigate the river safely and avoid collisions.
Mastering edging and carving is crucial for staying upright and maintaining balance on the river.
It's important to understand that in river kayaking, water flows from various directions and at different speeds. Not all flows move downstream, and some currents may even come straight back up towards you.
Carving refers to edging (tilting) your kayak towards the direction of your turn (the opposite of bilge steering). By doing so, you enable the water flow hitting your kayak's side to pass underneath smoothly while keeping yourself balanced. If you do not edge and carve when you should, the river flow will catch your kayak's edge, pulling it down, which can flip you over.
By developing the ability to edge and carve effectively, you enhance your stability, control, and ultimately, your enjoyment of river kayaking.
To develop a sense of your kayak's edges, we can start with static edging exercises on flat water. Static edging involves tilting the kayak while remaining still.
Here's how you can practice it:
Find a safe spot on flat water to begin.
Start by lifting one edge of your kayak. If you're lifting the right edge, pull your right knee up, drop your left hip down, and engage your abdominal muscles to maintain the lean. You can shift your weight towards the left side to help maintain the tilt.
Aim to hold the kayak on the edge enough that you feel a sense of challenge, almost as if you might tip over. This will indicate that you are pushing your limits and practising effectively.
By focusing on static edging exercises without any speed, you'll gradually develop a better understanding and control of your kayak's edges.
Once you feel comfortable with static edging, it's time to practice edging while paddling. Here's how you can do it:
While cruising along, start by paddling in a straight line. This will help you focus on the edging technique without the added complexity of turns.
Tilt your kayak by lifting one edge, just as you did during the static edging exercise.
As you tilt, make an effort to maintain the same rhythm in your paddling strokes. Try to keep your paddle strokes consistent and unaffected by the kayak's tilt.
This drill will help you develop the coordination required to edge your kayak while maintaining your paddling technique.
Start with gentle edges and gradually increase the tilt as you become more comfortable and confident.
Remember to focus on maintaining your paddling rhythm while tilting the kayak, as this will improve your overall paddling efficiency.
Now that you have practised edging and paddling, let's move on to the carving turn. The carving turn is a technique used to execute wide and controlled turns while maintaining forward speed.
Here's how you can create a carving turn:
While cruising straight, initiate a gentle turn by applying a slight amount of rudder.
As the turn begins, lean your body and edge the kayak into the turn, similar to how aeroplane banks or mountain bikers lean into a turn.
Maintain your forward speed and keep paddling on both sides to support the turn.
Focus on lifting and holding your outside edge up throughout the turn.
Avoid using too much rudder, as a slight amount will be sufficient to create a wide arc for the turn.
Remember to start with gentle turns and gradually increase the amount of edge as you gain confidence and control. With practice, you'll be able to execute smooth and precise carving turns on your next river trip.
To hear my in-depth discussion on boat handling drills you can do on flatwater, including my advice on exactly how to structure your next practice session, then listen to The Canterbury Kayaking Podcast Episode 9 above.
The last time I made a video on setting paddle length was back in 2012. A lot has changed since then and I feel this video has been long overdue.
In this new video, I share my thoughts on why you should no longer trust the traditional method for adjusting your paddle length. I go into detail on how to set your paddle length using the new system I've developed for Coast to Coast multisport athletes.
I hope you enjoy the video and consider giving it a try yourself!
The river was around 55 cumecs when I recorded my footage over the weekend before this year's event. But, there is some rain of the way! In this video I'll show you my recommended lines plus discuss the predicted rainfall and what this might mean for your upcoming race.
When you’re sitting down low in your kayak with the river falling towards the horizon, you’re pretty limited in how much you can see ahead of you. However you can in fact see farther than you think, if you simply take the time to look. While paddling on the river, it’s easy to go several minutes just staring down at the water right in front of your boat. Every second you move farther down the river, more of the horizon is being revealed to you. By constantly scanning the horizon as you paddle, you’ll be able to gain more information all the time. So stop staring at the front of your boat, and start searching for possible routes, potential hazards, and the answer might become obvious.
If you’ve been scanning the horizon and the answer still isn’t obvious, you’ll need to use rule number two “Go with the Flow”. By this I mean choose the braid with the most volume of water flowing down it. Not just the deepest, not just the fastest, but a combination of these two factors. You’re looking for the channel with the most water flowing down per-second (cubic metres per second). Developing your ability to read the water and judge the flow takes time and experience. Paddling braided rivers with a well organised club, participating in kayak races, and taking a multisport kayak course, are all great ways to build your ability to judge the water’s flow.
Every river I’ve ever paddled on, flowed down hill… except for the Waimakariri. Oddly enough, I’m not joking. As the river braids split into several channels, some of these channels drop down-hill quickly, while others appear to actually climb up-hill right in front of you. Of course, these channels can only flow up-hill for a short distance, until they eventually run out of momentum and end in a wide shallow pool. This is how many beginners get stranded during the Coast to Coast Race. When you’re sitting down at river-level, the braid that drops down quickly is hard to see (hidden by the horizon). The braid that is levelling-off or climbing up-hill slightly, is much more visible and often quite wide – it looks like the obvious place to go. As unaware paddlers follow this higher braid, the water in it eventually slows down, becomes shallow, and will split into channels so small, that kayaking becomes impossible. You’ll now have to drag you boat over the shallows and down to the lower braid you missed earlier. The lesson here is to take the braid that drops away the fastest. Get low early and the remaining water will surely find you again.
Sometimes you’ll need to make a tough choice. You often wont have much time to decide, and it’s usually best to make a decision early and stick with it. If you’re following rule number two and chose a braid going left that holds 60% of the total river volume, that means that 40% of the river is now to your right (not under your boat where you want it). Keep a mental map of the fact that a large portion of the river is somewhere out to your right side. Keep an eye out for an opportunity to link back up with this flow again. You want to be as close as possible to 100% flow volume under your boat at all times.
It’s important to understand that the rules described above work best when used in the correct order. If you’re looking down trying to figure out the volume of water (rule 2) you’re probably not looking up enough (rule 1), and may miss something really obvious. Similarly, it’s no good dropping low early (rule 3) if there’s simply not enough water volume to float your boat (rule 2). So at each decision point, work through your rules quickly in order from 1 to 4. Try not to skip ahead or make it more complicated than it is. Many of our clients will actually scribble these rules on the front of their boat for quick reference while paddling on the river.
It’s my experience as a kayak coach that sticking to the correct order of priority while under pressure is the hardest for new paddlers to master. One of the most valuable things you can do to develop your confidence in picking the braids is to attend our Coast to Coast Multisport Kayak Course. We’ll share with you all the clues that indicate good flow volume, plus you’ll gain lots of practice making your own choices using the rules mentioned here.
Time for one last tip. Remember to always look back over your shoulder after making a tricky braid decision. Review whether it was in fact the best choice for the situation, or if you could have chosen a better route. I personally do this all the time and it’s one way I keep myself learning and improving with every trip I take.
]]>]]>